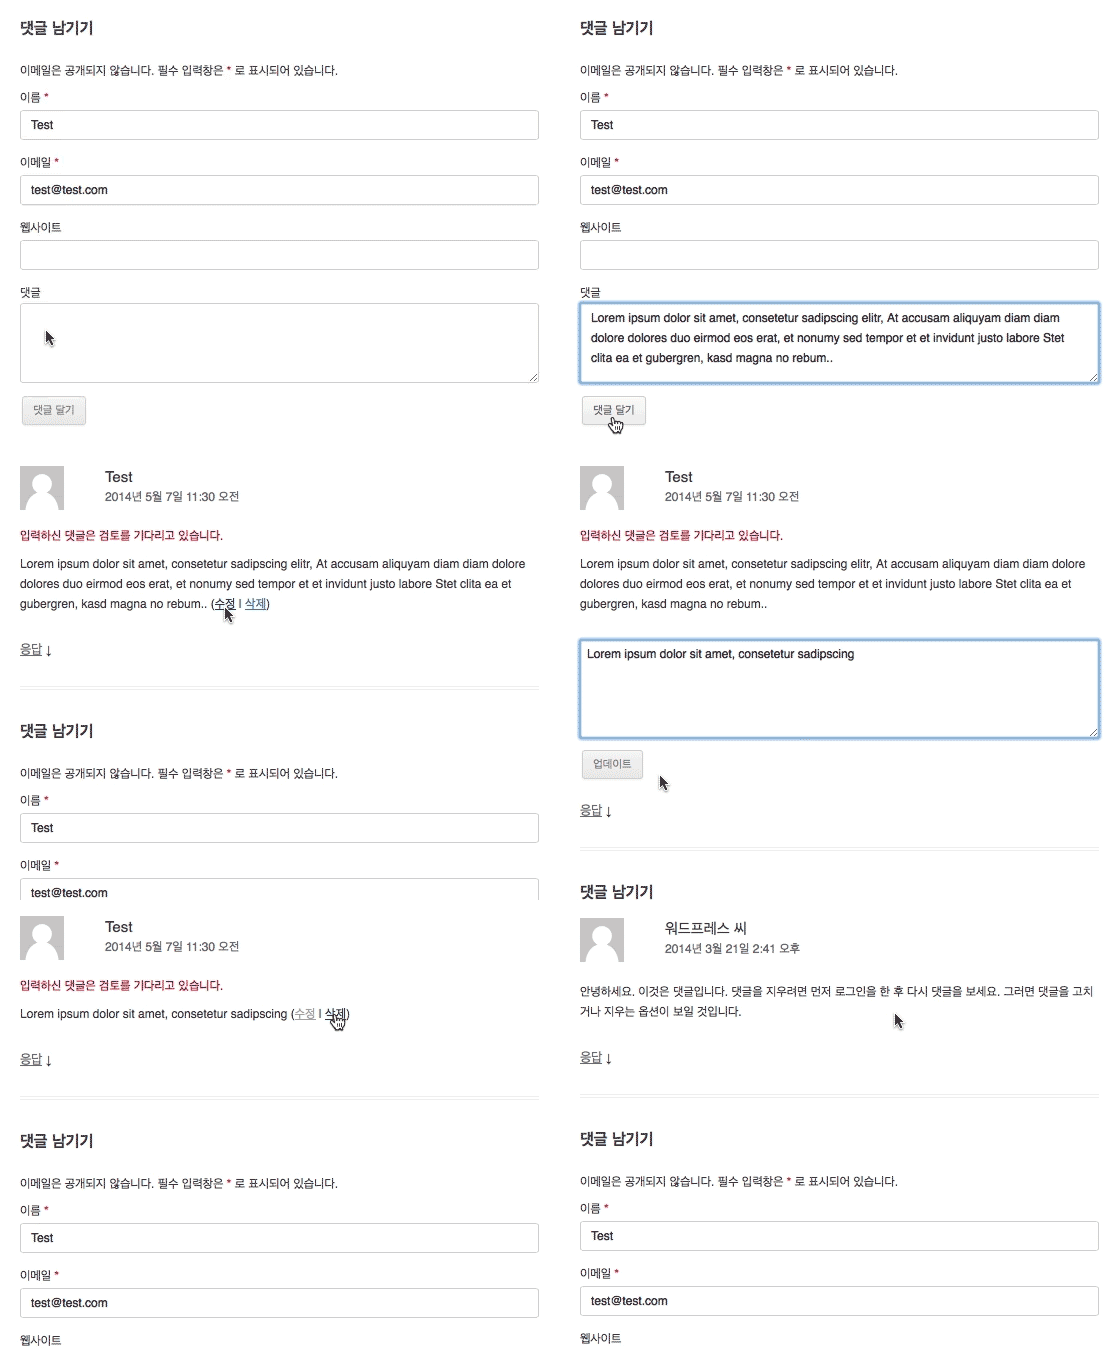
워드프레스의 기본 댓글 시스템은 작성자가 직접 댓글을 수정/삭제할 수 있는 기능을 제공하지 않습니다. 따라서 이러한 기능을 제공하기 위해서는 관련 플러그인을 설치하거나 직접 개발하여야 합니다.
* 워드프레스 CRUD를 읽어보셨나요? 본 포스트를 읽기전에 워드프레스에서의 데이터 요청 처리 방법을 먼저 익혀야 합니다.
자세한 설명에 앞서 제작 과정을 미리 살펴보겠습니다.
1. 클래스파일 생성, 테마 functions.php에 포함/인스턴스 생성
2. 작성자 인증을 위한 쿠키 생성.
3. 수정 링크 노출
5. 수정 폼 노출
6. 수정 처리
7. 삭제 링크 노출
8. 삭제 처리
클래스파일 생성, 테마 functions.php에 포함/인스턴스 생성
현재 사용중인 테마 디렉토리의 어딘가에 mycommteditable.php 파일을 생성하여 아래 코드를 저장합니다.
class MY_Commt_Editable {
	function __construct(){
	}
}
현재 사용중인 테마의 functions.php를 엽니다.
저는 현재 사용중인 테마의 inc 디렉토리에 mycommteditable.php를 생성하였기 때문에, 아래와 같은 경로로 클래스 파일을 포함하고 인스턴스를 생성하였습니다.
include 'inc/mycommteditable.php';
$GLOBALS['mycommteditable'] = new MY_Commt_Editable();
작업준비가 완료되었습니다. functions.php는 닫고, mycommteditable.php를 열어 댓글 수정/삭제 기능을 구현해봅시다.
작성자 인증을 위한 쿠키 생성
댓글이 저장되었을 때 작성자 인증을 위한 쿠키를 생성합니다.
작성자 인증을 위해 비밀번호를 받아 어딘가에 저장해두는 것이 전통적인 방식이지만, 개인정보에 민감한 요즘, 댓글 하나 남기자고 개인 비밀번호를 입력하는 것은 웬지 꺼림직합니다. 그래서 보통 사람들은 아주 단순한 비밀번호를 입력하는 경향이 있기 때문에 누군가 악의적으로 수정/삭제할 가능성이 오히려 높습니다. 그래서 저는 쿠기를 사용하여 인증하되 일정 시간 동안만 수정/삭제할 수 있는 기회를 줄 것입니다.
모든 액션은 생성자함수(__construct)에 걸도록 하겠습니다. 우선 댓글이 저장되자마자 실행되는 ‘comment_post’ 훅을 이용하여 액션을 걸겠습니다.
class MY_Commt_Editable {
	function __construct(){
		add_action( 'comment_post', array($this, 'set_cookie') );
	}
	function set_cookie($comment_id){
		$comment = get_comment($comment_id);
		$cookie_lifetime = apply_filters('mycommteditable_cookie_lifetime', 60*15);
		setcookie( 'mycommteditable_' . $comment_id . '_' . COOKIEHASH, md5($comment->comment_author_IP), time() + $cookie_lifetime, COOKIEPATH, COOKIE_DOMAIN );
	}
}
라인 7. 기본 유지시간을 15분으로 설정하였지만, 필터를 걸어 조정할 수 있게 해두었습니다.
라인 8. 인증을 위해 댓글별로 사용자의 아이피를 저장하되 md5로 암호화하였습니다.
수정 링크 노출
이제 댓글이 출력될 때 작성자 인증후 수정 링크를 노출시킵니다.
class MY_Commt_Editable {
	function __construct(){
		add_action( 'comment_post', array($this, 'set_cookie') );
		add_filter( 'comment_text', array($this, 'add_links'), 10, 2 );
	}
	function add_links($comment_text, $comment){
		if( $this->can_edit( $comment->comment_ID ) ){
			$edit_url = add_query_arg( array(
				'mycommtedit' => $comment->comment_ID,
			), get_comment_link($comment->comment_ID) );
			$links = '<a class="edit" href="' . $edit_url . '">수정</a>';
			$links = ' <span class="mycommteditable-links">' . $links .'</span> ';
			$comment_text .= $links;
		}
		return $comment_text;
	}
	function can_edit($comment_id){
		$comment = get_comment($comment_id);
		if( isset($_COOKIE['mycommteditable_' . $comment_id . '_' . COOKIEHASH])
			&& $_COOKIE['mycommteditable_' . $comment_id . '_' . COOKIEHASH] == md5($comment->comment_author_IP) )
			return true;
		return false;
	}
	//...
라인 4. 댓글 내용 뒷부분에 링크를 노출하기 위해 ‘comment_text’ 훅을 이용하여 액션을 걸어줍니다.
라인 6~16. 작성자 인증후, 댓글 고유주소에 댓글 아이디가 할당된 ‘mycommtedit’ 변수를 붙여 수정 URL를 만듭니다. ‘mycommtedit’ 변수는 수정 폼 노출을 위해 사용될 것입니다.
라인 17~23. 인증을 위한 코드는 재사용을 위해 함수화하였습니다.
수정 폼 노출
수정 링크를 노출하는 것과 같은 방식으로 수정 폼을 노출하도록 하겠습니다.
class MY_Commt_Editable {
	function __construct(){
		add_action( 'comment_post', array($this, 'set_cookie') );
		add_filter( 'comment_text', array($this, 'add_links'), 10, 2 );
		add_filter( 'comment_text', array($this, 'add_editor'), 99, 2 );
	}
	//...
	function add_editor($comment_text, $comment){
		if( isset( $_REQUEST['mycommtedit'] )
			&& $_REQUEST['mycommtedit'] == $comment->comment_ID
			&& $this->can_edit( $comment->comment_ID ) ){
			ob_start();
			?>
			<form id="mycommtedit-form" action="<?php echo admin_url('admin-post.php')?>" method="post">
				<input type="hidden" name="action" value="mycommtedit">
				<input type="hidden" name="nonce" value="<?php echo wp_create_nonce('mycommtedit');?>">
				<input type="hidden" name="comment_id" value="<?php echo $comment->comment_ID; ?>">
				<textarea name="comment_content" rows="6"><?php echo esc_textarea($comment->comment_content);?></textarea>
				<input type="submit" value="업데이트">
			</form>
			<?php
			$comment_text = ob_get_clean();
		}
		return $comment_text;
	}
	//...
라인 5. 댓글 내용 뒷부분에 링크를 노출하기 위해 ‘comment_text’ 훅을 이용하여 액션을 걸어주되 우선순위를 99로 낮추어줍니다. 우선순위를 낮추어주는 이유는 다른 필터들이 모두 적용된 이후에 안전하게 폼을 덧붙이기 위함입니다. 만약 우선순위를 10으로 설정한다면, ‘comment_text’ 훅으로 걸려있는 기본 필터들에 의해 HTML이 손상될 수 있기 때문입니다.
라인 9. ‘mycommtedit’ 변수요청이 있는지 확인
라인 10. ‘mycommtedit’ 변수가 현재 댓글 아이디와 같은지 확인
라인 11. 작성자 인증
라인 12. 출력 버퍼 시작
라인 22. 출력 버퍼 리턴
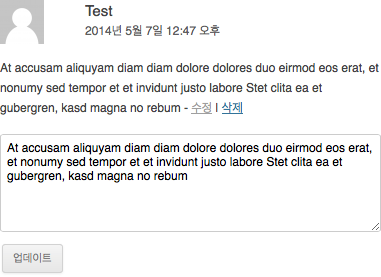
그러면 아래 그림과 같이 댓글 내용 뒤에 폼이 나타날 것입니다.

수정 처리
수정 폼의 admin_url, action, nonce의 정체를 잘 모르시겠다면, 워드프레스 CRUD를 먼저 읽어보셔야 합니다. 요청 데이터에 대한 처리 방법은 워드프레스 CRUD와 거의 동일하므로 자세한 설명은 생략하도록 하겠습니다.
class MY_Commt_Editable {
	function __construct(){
		add_action( 'comment_post', array($this, 'set_cookie') );
		add_filter( 'comment_text', array($this, 'add_links'), 10, 2 );
		add_filter( 'comment_text', array($this, 'add_editor'), 99, 2 );
		add_action( 'admin_post_mycommtedit', array($this, 'edit_request') );
		add_action( 'admin_post_nopriv_mycommtedit', array($this, 'edit_request') );
	}
	//...
	function edit_request(){
		if( ! isset($_REQUEST['nonce'])
			|| ! wp_verify_nonce($_REQUEST['nonce'], 'mycommtedit')
			|| ! isset($_REQUEST['comment_id']) )
			return;

		$comment_id = $_REQUEST['comment_id'];
		if( $this->can_edit( $comment_id ) ){
			$data = array(
				'comment_ID' => $comment_id,
				'comment_content' => $_REQUEST['comment_content'],
			);
			wp_update_comment( $data );
			$goback = get_comment_link($comment_id);
			wp_redirect( $goback );
			exit;

		}else{
			wp_die( '댓글 수정 권한이 없거나 쿠키가 만료되었습니다.' );
		}
	}
	//...
라인 6~7. 수정 요청을 캐치하기 위해 액션을 걸어줍니다.
라인 11~14. 요청 변수 검증
라인 17. 작성자 인증
라인 18~22. 댓글 내용 업데이트
라인 23~25. 댓글 고유주소로 리다이렉트
삭제 링크 노출
add_links 함수를 수정하여 삭제 링크를 수정 링크 옆에 노출시켜봅시다.
	//...
	function add_links($comment_text, $comment){
		if( $this->can_edit( $comment->comment_ID ) ){
			$edit_url = add_query_arg( array(
				'mycommtedit' => $comment->comment_ID,
			), get_comment_link($comment->comment_ID) );

			$delete_url = add_query_arg( array(
				'action' => 'mycommtdelete',
				'comment_id' => $comment->comment_ID,
				'nonce' => wp_create_nonce('mycommtdelete'),
			), admin_url('admin-post.php') );

			$links = '<a class="edit" href="' . $edit_url . '">수정</a>';
			$links .= '<span class="sep"> | </span>';
			$links .= '<a class="delete" href="' . $delete_url . '">삭제</a>';
			$links = ' <span class="mycommteditable-links">' . $links .'</span> ';
			$comment_text .= $links;
		}
		return $comment_text;
	}
	//...
라인 8~12. 삭제 URL 구성
라인 15~16. 삭제 링크 추가
삭제 처리
삭제 URL 구성 및 데이터 처리는 ‘수정 처리’와 마찬가지로 워드프레스 CRUD와 거의 동일하므로 자세한 설명은 생략하도록 하겠습니다.
class MY_Commt_Editable {
	function __construct(){
		add_action( 'comment_post', array($this, 'set_cookie') );
		add_filter( 'comment_text', array($this, 'add_links'), 10, 2 );
		add_filter( 'comment_text', array($this, 'add_editor'), 99, 2 );
		add_action( 'admin_post_mycommtedit', array($this, 'edit_request') );
		add_action( 'admin_post_nopriv_mycommtedit', array($this, 'edit_request') );
		add_action( 'admin_post_mycommtdelete', array($this, 'delete_request') );
		add_action( 'admin_post_nopriv_mycommtdelete', array($this, 'delete_request') );
	}
	//...
	function delete_request(){
		if( ! isset($_REQUEST['nonce'])
			|| ! wp_verify_nonce($_REQUEST['nonce'], 'mycommtdelete')
			|| ! isset($_REQUEST['comment_id']) )
			return;

		$comment_id = $_REQUEST['comment_id'];
		if( $this->can_edit( $comment_id ) ){
			wp_delete_comment( $comment_id, false );
			$this->delete_cookie($comment_id);
			$goback = wp_get_referer();
			wp_redirect( $goback );
			exit;

		}else{
			wp_die( '댓글 삭제 권한이 없거나 쿠키가 만료되었습니다.' );
		}
	}
	//...
	function delete_cookie($comment_id){
		setcookie( 'mycommteditable_' . $comment_id . '_' . COOKIEHASH, ' ', time() - YEAR_IN_SECONDS, COOKIEPATH, COOKIE_DOMAIN );
	}
	//...
라인 8~9. 삭제 요청을 캐치하기 위해 액션을 걸어줍니다.
라인 13~16. 요청 변수 검증
라인 19. 작성자 인증
라인 20. 댓글 삭제
라인 21. 쿠키 삭제
라인 22~24. 이전 페이지로 리다이렉트
Fork?
간단히 댓글 수정/삭제 기능을 구현해보았는데요,
비록 짧은 시간 동안만 수정/삭제 기회를 부여한다지만, 공공장소에서의 작성을 고려하여 ‘쿠키 저장 허용 확인’ 또는 ‘쿠키 강제 삭제’ 기능을 추가한다거나 ‘관리자에게 이메일로 수정/삭제 알림’ 기능, ‘응답(댓글의 댓글)이 있는 댓글 삭제 금지’ 등을 보완한다면 당장 실서비스에 적용해도 무방하리라 생각합니다.